


Musings: Steps to making your own maple syrup

It’s maple syrup time again! Want to see the steps we take to DIY it? We are excited to see signs of spring, but hope it doesn’t come too fast. Why? Because prime time for collecting maple sap is when the nights are still below freezing and daytime temps are in the 30’s and 40’s. We are far from pros, but thankfully it was simple enough even for us to figure out so I’m sure you can too. It’s simple though time-consuming.
We are using maple syrup tapping supplies like these: taps, bags and covers.

Stage one: Tapping the trees!
Jeff and the boys went out to tap the trees. He used a 5/16″ drill bit and drilled an angled hole (so the sap would easily flow downward) about 2″ deep and 5ish feet off the ground.

Our bags get wrapped around a oval metal base and the cover slides onto that base. Very simple.

The taps also function as a hook to hang from. I love this action photo below of the immediate and satisfying drip, drip, drip. As long as the temperature is above freezing (but not too warm) that drip happens all day long and will fill the bag pretty quickly. On the best days, our bags fill in a couple days.

On to the next tree.

This “tree” is like three in one. Three large trunks all in one spot. It got tapped in three places.

In all, we placed 10. Several around our property and in an obliging neighbor’s lot across the road.


Stage Two: Boiling!
Within a quick timeframe we had about 30-40 gallons of sap! We are still collecting sap but with nowhere else to store it, we really needed to start a round of boiling.

Last year we did just a little bit (several pints and half-pints spread out over many days) so we managed on our stove-top. It was doable if you are just playing around but the steam it creates necessitates doing the boiling outside if you have lots of sap. Otherwise you risk your kitchen to too much moisture.

Our faithful watching of Craigslist paid off when we found two large stainless steel pots from a local restaurant which had gone out of business. The wider pot has more surface area so it was our go to pot for the boiling. And the taller pot was great for the sap that was strained and “on-deck”.

Jeff used a clean cotton cloth to strain the sap. Our covers kept out most impurities but you’ll still get a stray ant or small twig here and there.

The sap looks just like water. And tastes slightly sweet.

After much stoking of the fire and keeping it at a boil for a few hours, the sap will go from clear to amber.

As the pot boiled down, Jeff added sap. And stoked the fire, and added sap, and stoked the fire, and added sap. All. Day. Long.
And then stoked the fire, and added sap some more.
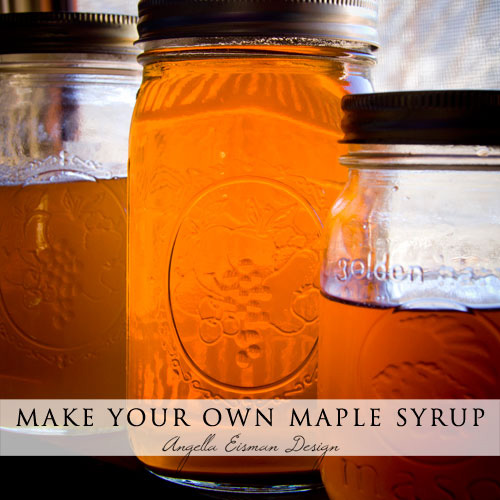
Finally, those 30 gallons of sap had boiled down to about 4 and we started bringing batches inside to finish on our stovetop. We could keep an eye on it better in there (plus it was dark outside by then).

We used a candy thermometer to watch the temperature. Our goal was 220 degrees. When the syrup gets close to done, it will bubble differently. The bubbles no longer look like boiling water but rather the beginning stage of a bubbling candy. You’ll know what I mean when you see it happening. When it gets to that point, watch your thermometer. The pros will scoff (and I don’t blame them since I’m no pro!) but this unscientific process worked well for us. So far this season, we have 2 1/2 quarts of syrup that tastes just like the pros make. :)

If you are running the numbers, you are noticing that this isn’t saving money…especially if you figure in the hours involved! We buy only pure maple syrup and love our pancakes so it is something we would have bought no matter.
We spent under $50 on taps, bags and covers and $30 on the two pots. Our wood was free. After checking Amazon’s pricing, I figure our 4-5 quarts (from this year and last) are worth $80-$100. Thus, we have just broken even or are slightly ahead without considering our time in.
The benefits? Lots of learning and it got us outside for more hours on cold days when we would have otherwise stayed in.